Getting started with PHP on Azure
Introduction
Hello Everyone, today let's make ourselves ready to learn a new topic i.e. hosting PHP application on Azure. Many of us must have came across the word Azure and some of us must be knowing how to host the application written in PHP on it. Today we will go over how to host the application on Azure and how to auto-deploy the code through GitHub. So, why to wait !! Lets start then :).
Background
In this blog, we will mainly come across these following words.
1. PHP
2. Microsoft Azure
3. GitHub
1. PHP
2. Microsoft Azure
3. GitHub
1. PHP :-
Quote:"PHP is a server-side scripting language designed for web development but also used as a general-purpose programming language." - wiki
The word PHP i.e. Hypertext Preprocessor earlier called as Personal Home Page. In 1994, Rasmus Lerdorf created this pretty language and in 1995, it came into existence as an open source technology. Because of its simplicity (as most of the syntax resembles to C, C++, Java), it is much popular in web development market and among the developers. One can take 100% advantage of using this language to make dynamic web pages quickly. It is a server side scripting language. Server side, as the name suggests, it runs on a web server and it requires a web browser to send/receive request/response. Scripting language, as the name suggests, it is only compiled when an interpreter reads it and convert it into machine understandable language.
But, first and foremost thing why developers love this technology is easy to learn, free of cost, platform independent and secure.
2. Microsoft Azure :-
Quote:“Microsoft Azure is a cloud computing platform and infrastructure created by Microsoft for building, deploying, and managing applications and services through a global network of Microsoft-managed data centers.” – wiki
The name Azure suggests, bright blue in colour like a cloudless sky. But in our context, this is little different :D. It is a platform which provides PaaS (Platform as a Service) and IaaS (Infrastructure as a Service) categories of cloud computing services. It supports many different programming languages including Microsoft and non-Microsoft related technologies. Azure was launched on 1st February 2010 as Windows Azure and then acquired the name as Microsoft Azure on 25th March 2014.
It is easy to publish and manage websites with PaaS environment. Mostly used for cloud computing, which literally means of using network to manage data, process and store which is hosted on remote servers rather than a local or personal server.
3. GitHub:-
Quote:
“GitHub, Inc. is a United States-based global company that provides hosting for software development version control using Git.” – wiki
I hope everyone here are familiar with GIT, the version control system which is used for data integrity and support for distributed workflows. It is used to manage source code and the name satisfies as SCM, Source Code Management.
Github is the solution for professional teams who uses GIT. It offers hosting source code in free of cost and it has the option to add wikis for project & option to track issues.
Using the steps
Now, let’s start with setting up and host a PHP application on Azure.
Step 1 :-
First, we need to login into the account on Azure Portal. For that, we need to provide work or school or personal Microsoft account, otherwise need to create a new Microsoft account without any cost.
Once you successfully logged in into the system, it will redirect into Azure Portal page. See the below image for reference.
 |
| Azure Dashboard |
Step 2 :-
Now, click on Create Resources button for creating the base/marketplace.
 |
| Create New Resource |
Then search And select Web App + MySQL for hosting the application. Click on Create button for creating the hosting setup.
 |
| Create Web App Resource |
Step 3 :-
Once you click on Create button, it will open one form to provide App Name, Subscription Details, Resource Group, Database Details and Legal Terms to accept. Provide a unique App Name as the website hosting name would be app_name.azurewebsites.net and the DB details (choose Database pricing tier as Mercury, the free one) as like below.
 |
| Generate web app With Db |
Step 4 :-
Once you provide every information mentioned above, check Pin to dashboard option and click on Create. Now, it will start the process of deployment the server and it may take few time to complete the process.
 |
| Dash Board |
Step 5 :-
Now lets go to GitHub (https://github.com/) and create the account. Do the Signup here and you can see the Dashboard like the below once you successfully logged in into the system.
 |
| GitHub Repository |
Step 6 :-
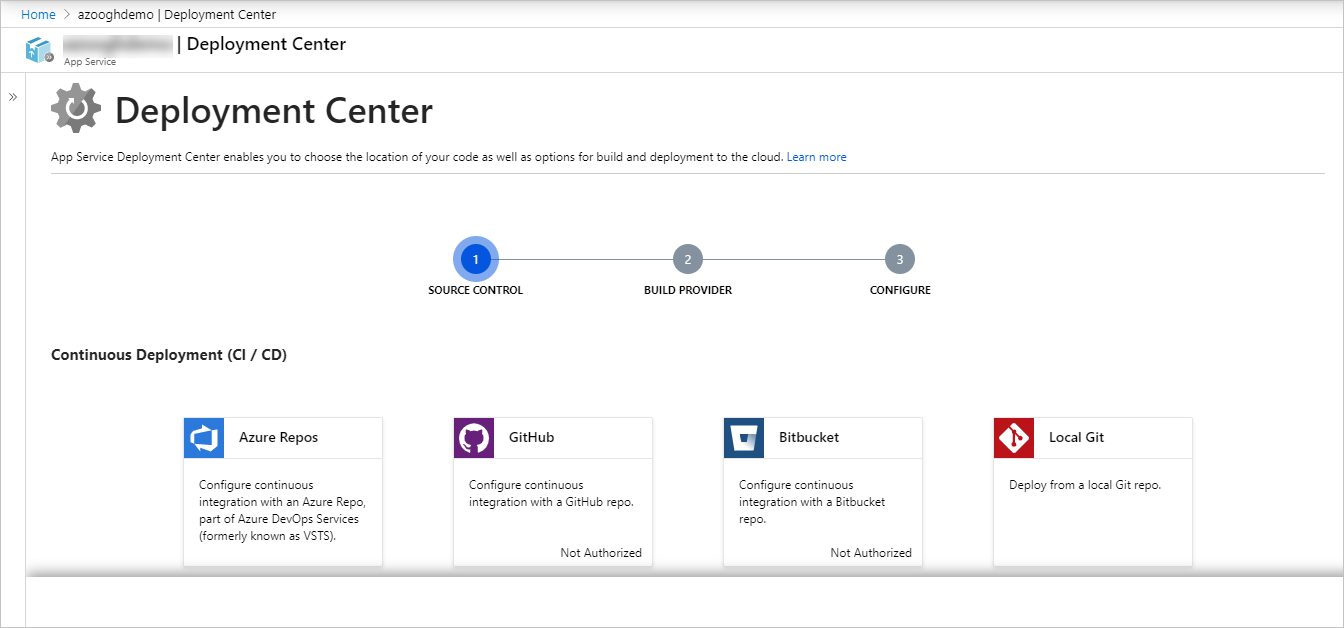
Now time is to connect Azure with the deployment source for continuous integration. Again lets go to https://portal.azure.com and click on All Resources. Select the app we have created so far i.e. test-demo-app (type as App Service) and then choose Deployment Center from Deployment section like below.
 |
| Deployment Center |
Step 7 :-
Click on Choose Source and select GitHub as the source. Provide the Authorization details of GitHub. Once Authorization is completed,
 |
| Select Deployment Center |
it will ask to choose Project and branch. Provide all the details like below.
Enable continuous deployment
After you authorize a source control service, configure your app for continuous deployment through the built-in Kudu App Service build server, or through Azure Pipelines.
Option 1: Kudu App Service
You can use the built-in Kudu App Service build server to continuously deploy from GitHub, Bitbucket, or Azure Repos.
- In the Azure portal, search for App Services, and then select the App Service you want to deploy.
- On the app page, select Deployment Center in the left menu.
- Select your authorized source control provider on the Deployment Center page, and select Continue. For GitHub or Bitbucket, you can also select Change account to change the authorized account.NoteTo use Azure Repos, make sure your Azure DevOps Services organization is linked to your Azure subscription. For more information, see Set up an Azure DevOps Services account so it can deploy to a web app.
- For GitHub or Azure Repos, on the Build provider page, select App Service build service, and then select Continue. Bitbucket always uses the App Service build service.
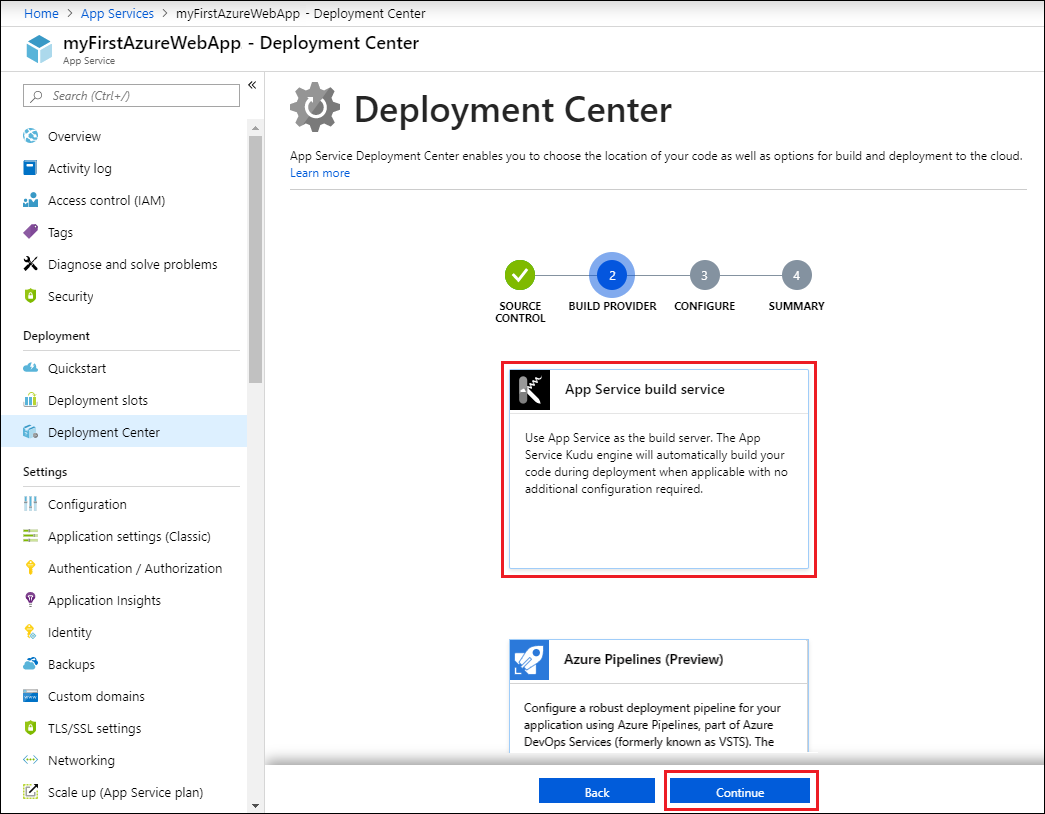
- On the Configure page:
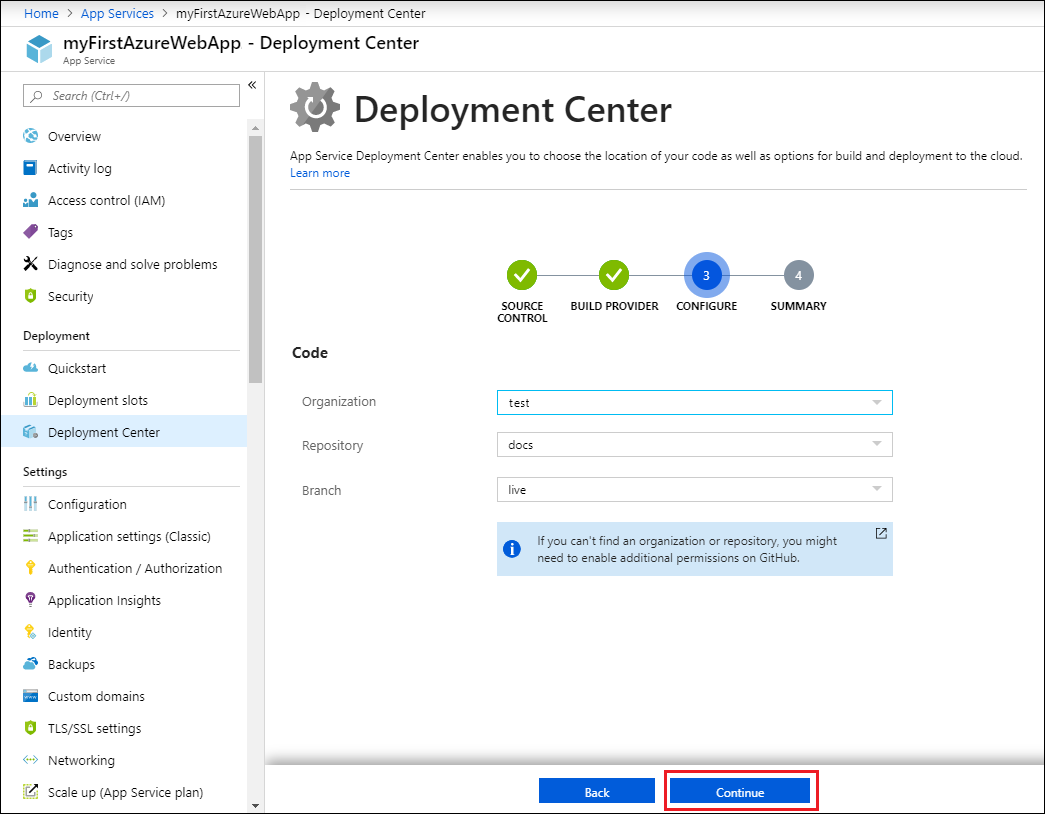
- For GitHub, drop down and select the Organization, Repository, and Branch you want to deploy continuously.NoteIf you don't see any repositories, you may need to authorize Azure App Service in GitHub. Browse to your GitHub repository and go to Settings > Applications > Authorized OAuth Apps. Select Azure App Service, and then select Grant. For organization repositories, you must be an owner of the organization to grant the permissions.
- For Bitbucket, select the Bitbucket Team, Repository, and Branch you want to deploy continuously.
- For Azure Repos, select the Azure DevOps Organization, Project, Repository, and Branch you want to deploy continuously.NoteIf your Azure DevOps organization isn't listed, make sure it's linked to your Azure subscription. For more information, see Set up an Azure DevOps Services account so it can deploy to a web app..
- Select Continue.
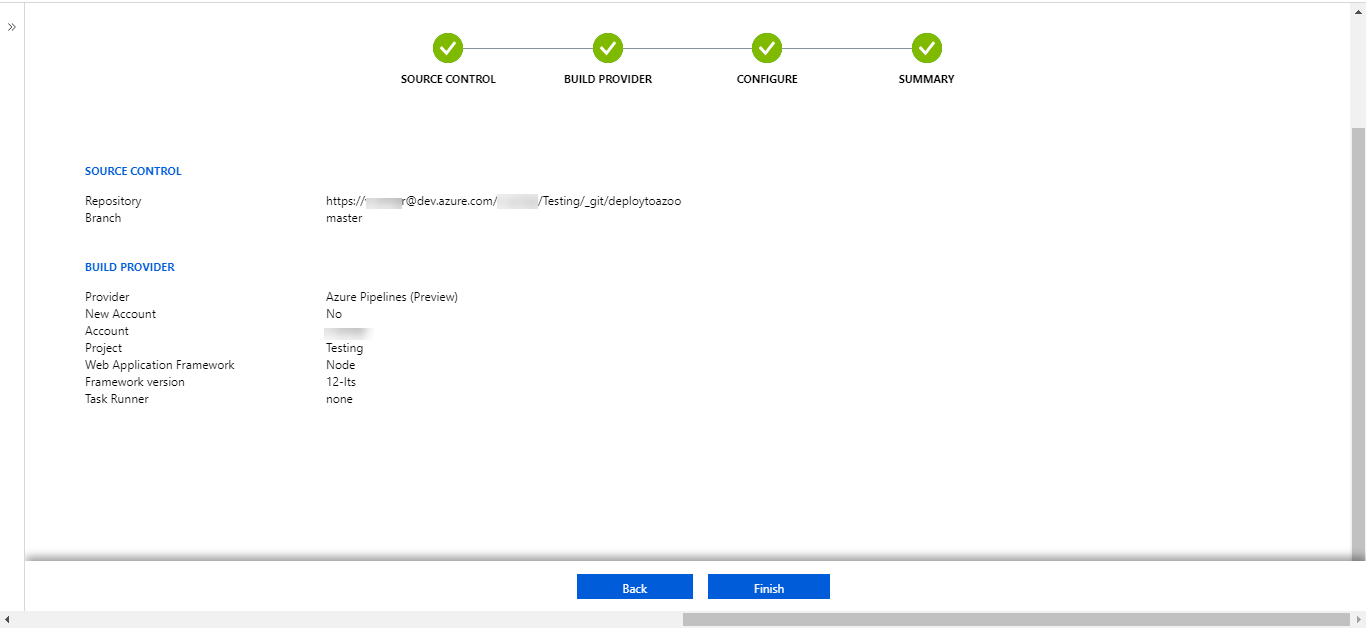
- After you configure the build provider, review the settings on the Summary page, and then select Finish.
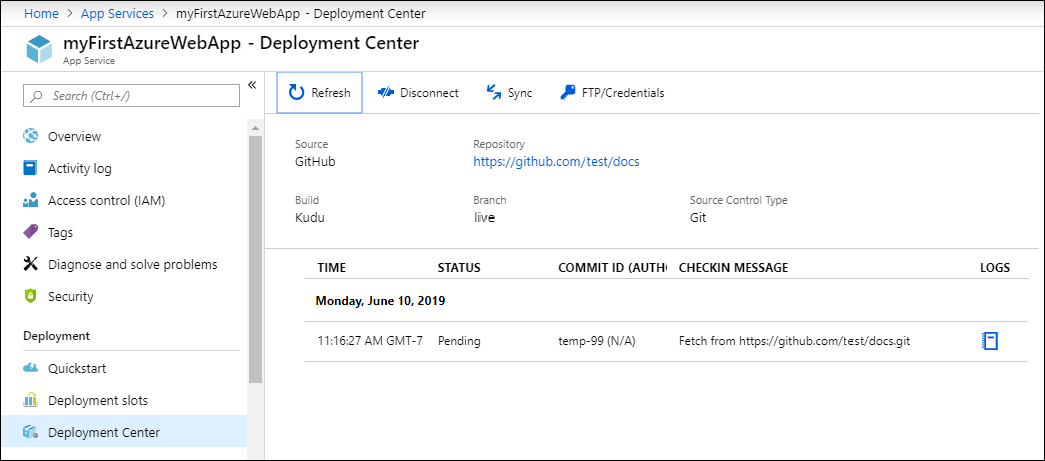
- New commits in the selected repository and branch now deploy continuously into your App Service app. You can track the commits and deployments on the Deployment Center page.
Option 2: Azure Pipelines
If your account has the necessary permissions, you can set up Azure Pipelines to continuously deploy from GitHub or Azure Repos. For more information about deploying through Azure Pipelines, see Deploy a web app to Azure App Services.
Prerequisites
For Azure App Service to create continuous delivery using Azure Pipelines, your Azure DevOps organization should have the following permissions:
- Your Azure account must have permissions to write to Azure Active Directory and create a service.
- Your Azure account must have the Owner role in your Azure subscription.
- You must be an administrator in the Azure DevOps project you want to use.
GitHub + Azure Pipelines
- In the Azure portal, search for App Services, and then select the App Service you want to deploy.
- On the app page, select Deployment Center in the left menu.
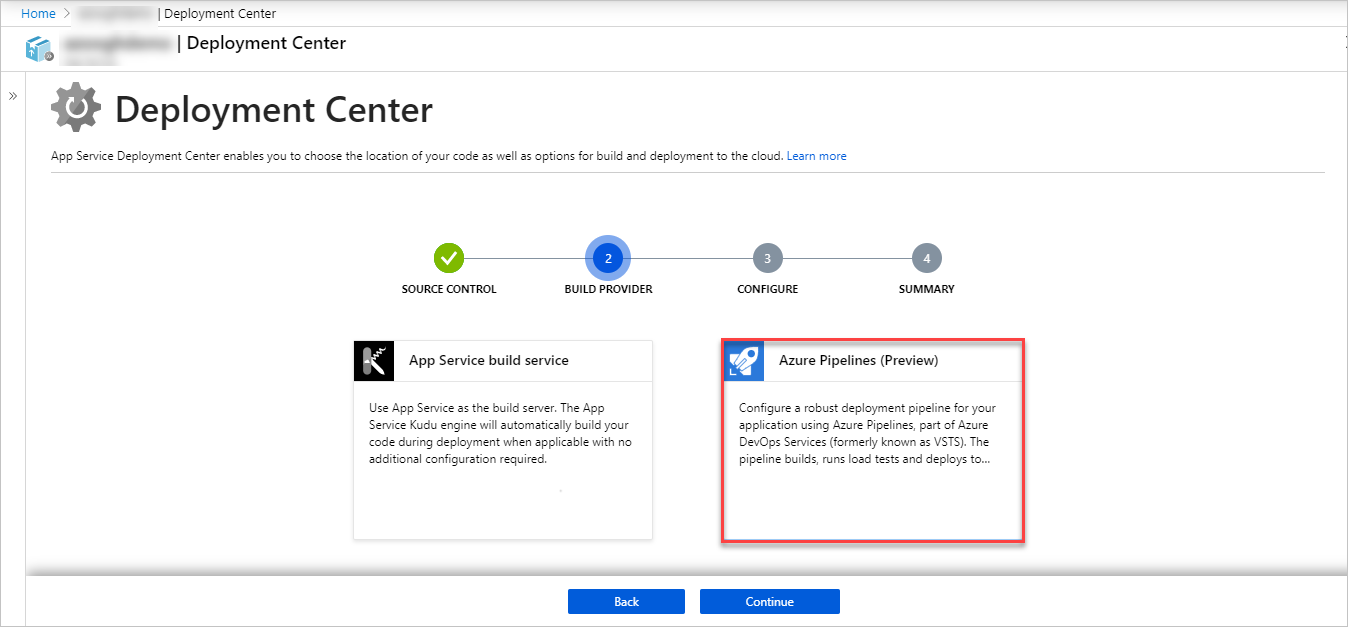
- Select GitHub as the source control provider on the Deployment Center page and select Continue. For GitHub, you can select Change Account to change the authorized account.
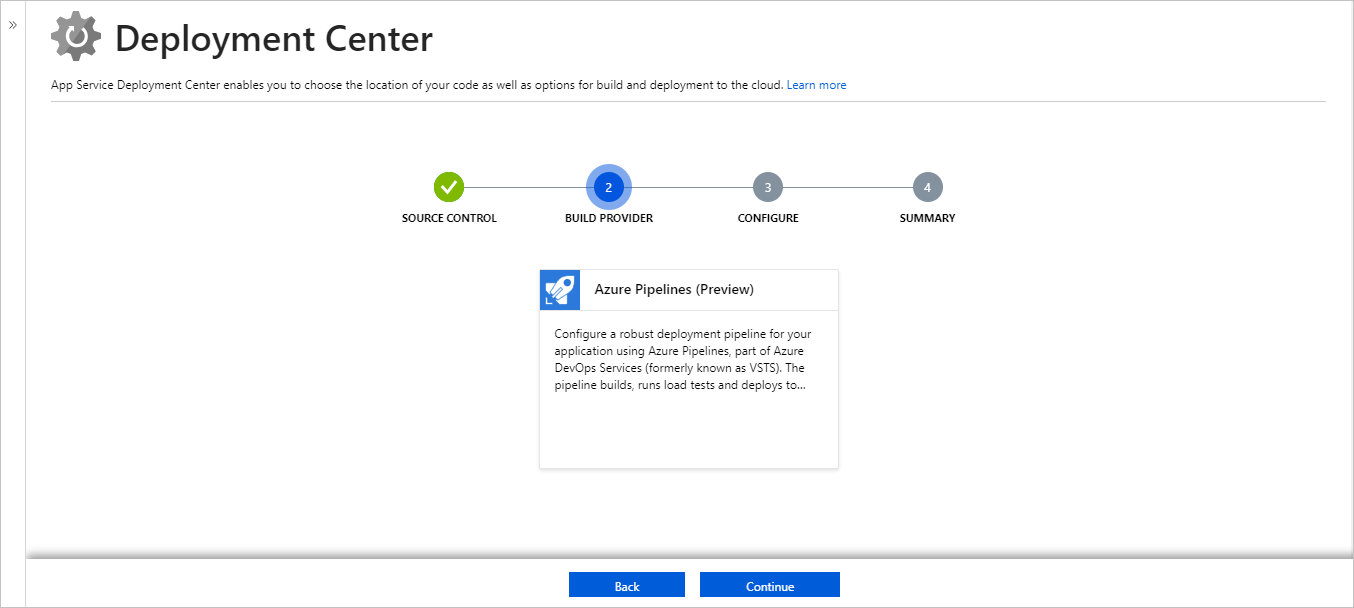
- On the Build Provider page, select Azure Pipelines (Preview), and then select Continue.
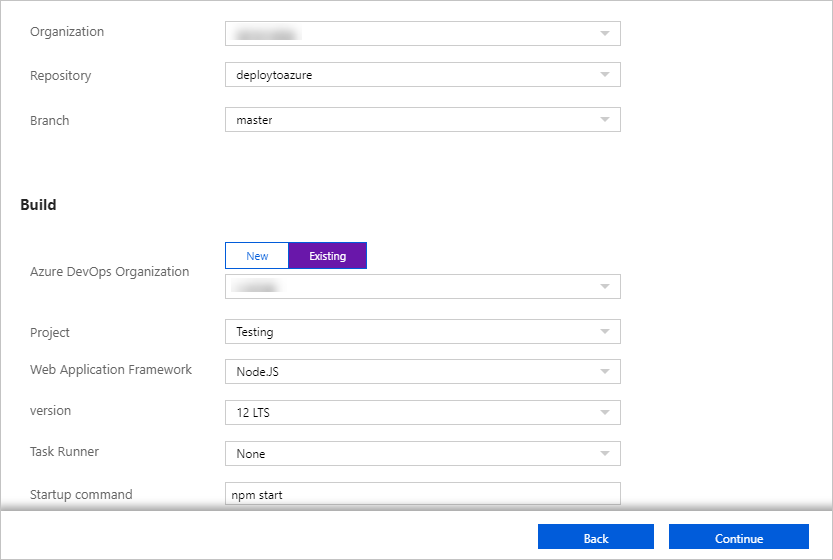
- On the Configure page, in the Code section, select the Organization, Repository, and Branch you want to deploy continuously and select Continue.NoteIf you don't see any repositories, you may need to authorize Azure App Service in GitHub. Browse to your GitHub repository and go to Settings > Applications > Authorized OAuth Apps. Select Azure App Service, and then select Grant. For organization repositories, you must be an owner of the organization to grant the permissions.In the Build section, specify the Azure DevOps Organization, Project, language framework that Azure Pipelines should use to run build tasks, and then select Continue.
- After you configure the build provider, review the settings on the Summary page, and then select Finish.
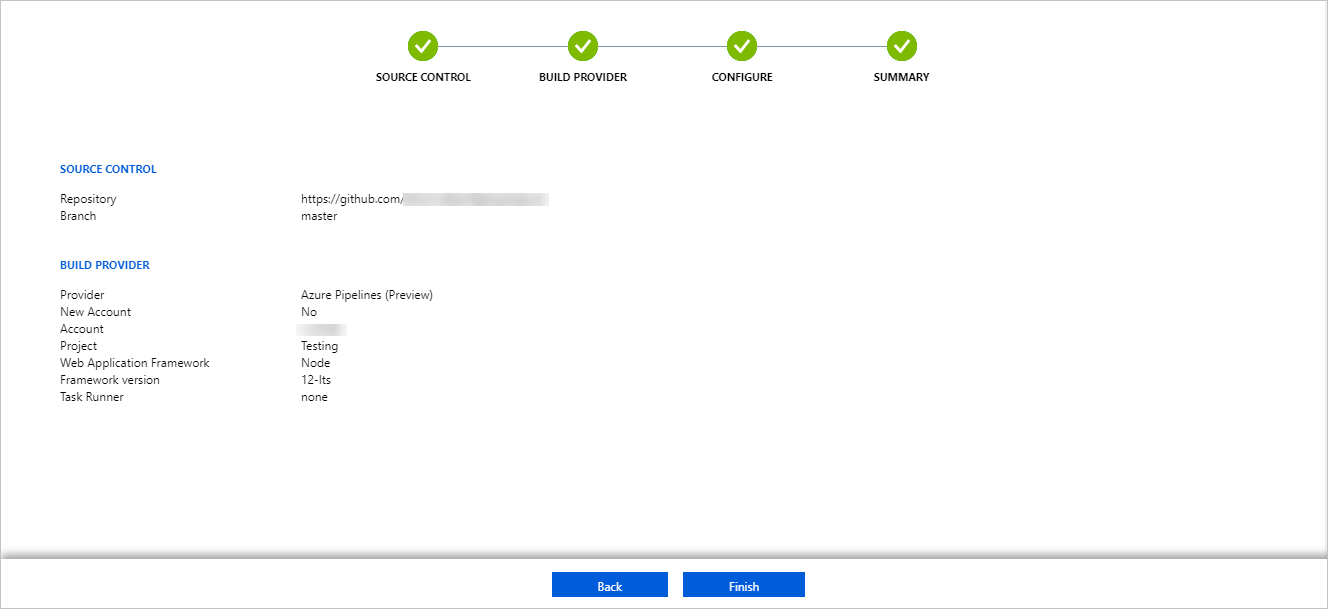
- New commits in the selected repository and branch now deploy continuously into your App Service. You can track the commits and deployments on the Deployment Center page.
Azure Repos + Azure Pipelines
- In the Azure portal, search for App Services, and then select the App Service you want to deploy.
- On the app page, select Deployment Center in the left menu.
- Select Azure Repos as the source control provider on the Deployment Center page and select Continue.
- On the Build Provider page, select Azure Pipelines (Preview), and then select Continue.
- On the Configure page, in the Code section, select the Organization, Repository, and Branch you want to deploy continuously and select Continue.NoteIf your existing Azure DevOps organization isn't listed, you may need to link it to your Azure subscription. For more information, see Define your CD release pipeline.In the Build section, specify the Azure DevOps Organization, Project, language framework that Azure Pipelines should use to run build tasks, and then select Continue.
- After you configure the build provider, review the settings on the Summary page, and then select Finish.
- New commits in the selected repository and branch now deploy continuously into your App Service. You can track the commits and deployments on the Deployment Center page.
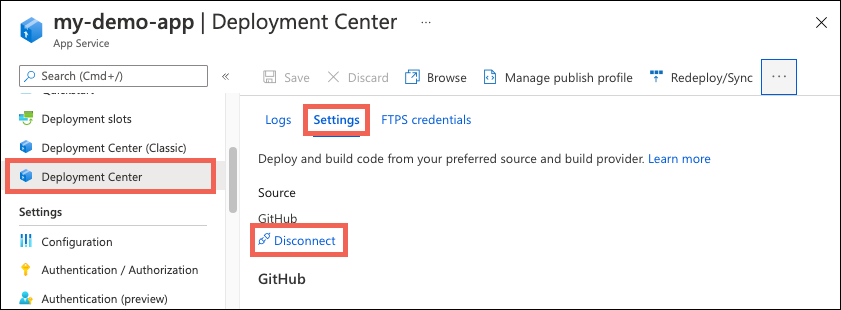
Disable continuous deployment
To disable continuous deployment, select Disconnect at the top of your app's Deployment Center page.

Comments
Post a Comment